This challenge comes from the OSINT.Industries Christmas CTF, hosted by the osint.industries team on ctf.osint.industries. Like many of their tasks, it starts with almost nothing — a redacted forum URL, a timestamp, and a thread URI. No forum name, no archive link, no obvious username. The whole task is about reconstructing context purely from structure and historical breadcrumbs.
Step 1: Identifying the redacted forum
The first thing that stood out was the URL structure:
That Thread-<title> pattern is extremely characteristic of MyBB. MyBB automatically converts thread titles into URL-safe slugs by replacing spaces with hyphens and stripping special characters.
So instead of guessing blindly, I narrowed the scope to popular MyBB-based underground cybercrime related forums active in 2018:
1 2 3 4
raidforums
XSS.is
Nulled
OGUsers
Given the theme of the thread (combo lists, streaming accounts, mass credentials) and the time period, the most realistic candidate by far was RaidForums. It was the hub for this exact type of content in 2018.
From that point on, I treated the forum as raidforums.com.
Step 2: Reversing the thread title from the URI
Since MyBB slugs are derived directly from the thread title, the next move was to reverse-engineer what the original post title most likely looked like.
The URI suggests several realistic variants:
1
2
3
New User pass 40k gmail prmuim netflix hulu steam uplay spotify
New [User:pass] 40k gmail prmuim netflix hulu steam uplay spotify
New [User:pass] 40k [gmail prmuim netflix hulu steam uplay spotify]
All of these match common RaidForums naming conventions from that era — short, spammy, keyword-heavy titles optimized for attention.
Now I had:
a forum (RaidForums)
a likely thread title
a precise timestamp (May 11, 2018 – 03:38 PM)
Step 3: Looking for archived traces
Next, I started checking archiving services for snapshots around May 2018. Wayback Machine had an archive from May 12, 2018, but not May 11:
That snapshot included lists of active users from the last 24 hours. In theory, the thread author should be present there somewhere.
Unfortunately, the thread itself was never archived, and brute-forcing through user lists didn’t give a direct hit.
That’s when I discovered rf-archive.com.
At first glance, it looked completely dead. The site was not working. I assumed it was just another abandoned mirror — but I still decided to try pulling archived snapshots from it programmatically.
After hours of scraping (and fighting archive.org rate limits), I got nothing.
This CTF felt like I was hitting a wall over and over again. The obvious lead was rf-archive.com, which should have been the goldmine. I spent way too much time scraping archived snapshots from it, pulling Wayback URLs, parsing HTML, grepping for thread keywords — all of that — and got basically nothing useful. At that point, I almost dropped the challenge entirely.
Instead of brute-forcing the same thing again, I switched tactics
Step 4: Find where rf-archive actually lives
I went to fofa.com and searched for:
1
body="raidforums"
The idea was simple: anything hosting RaidForums-related content might expose mirrors, archives, or forgotten infrastructure. While digging through the results, I accidentally stumbled upon something interesting — the IP address behind rf-archive.com.
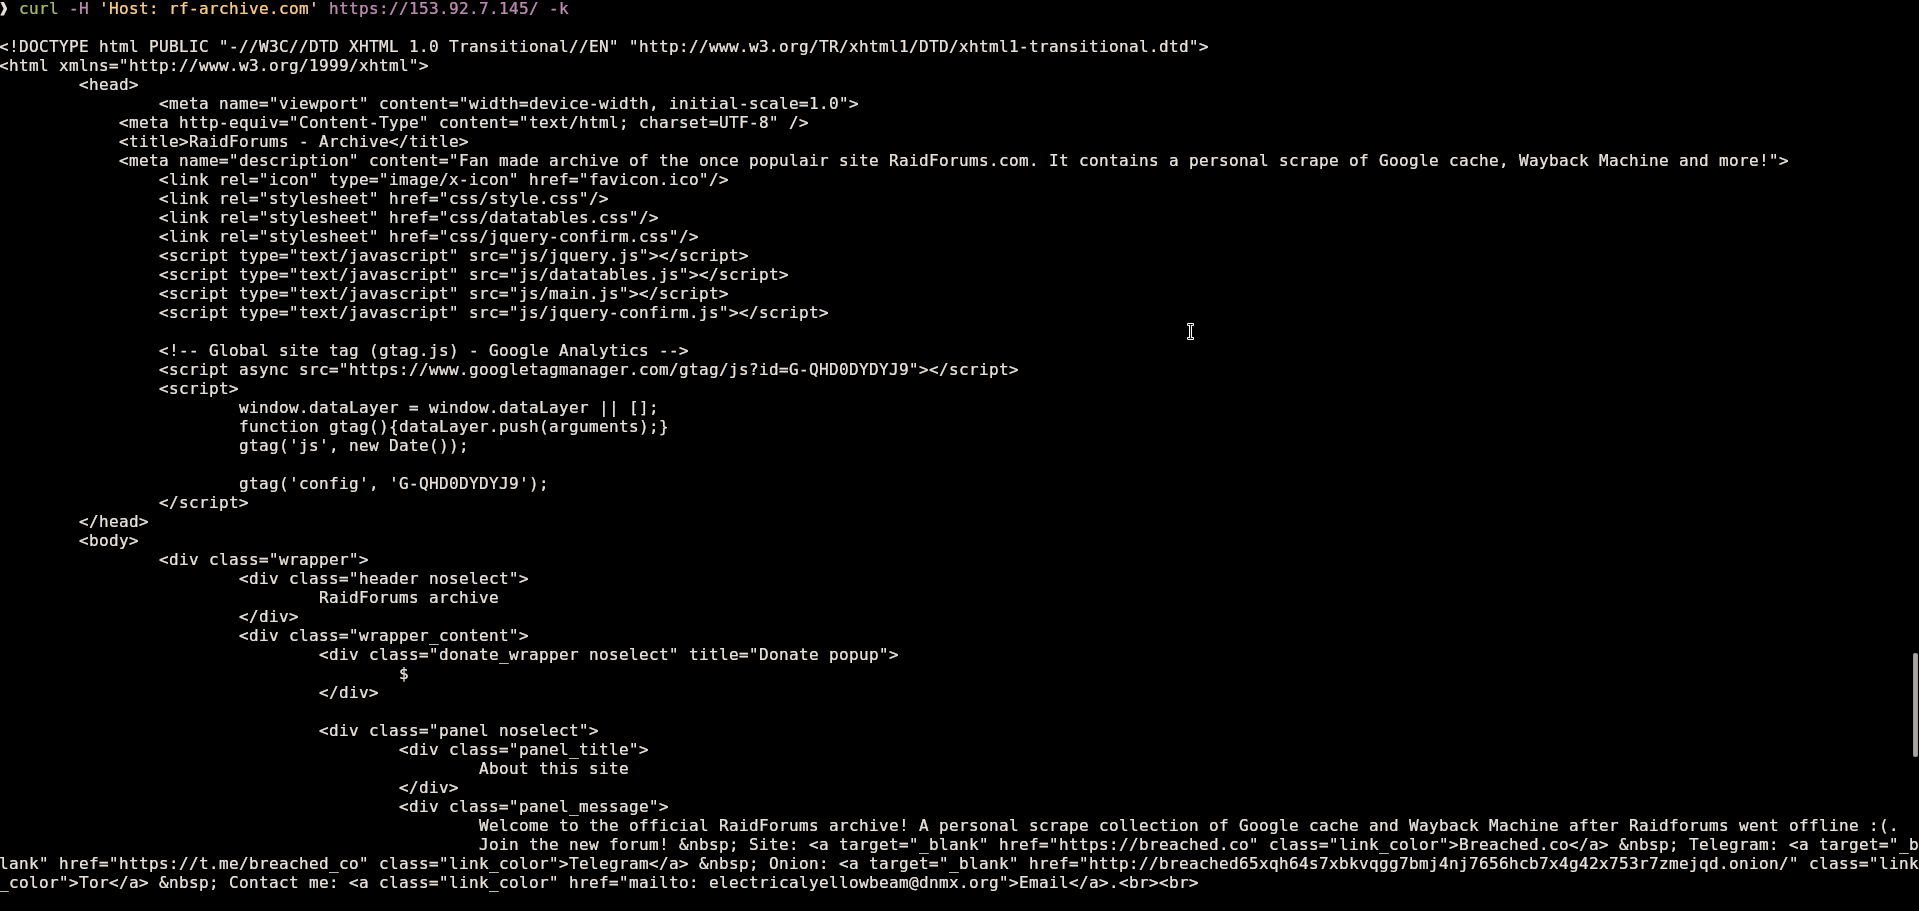
That’s when I decided to try a classic Host header trick.
At that moment, it was clear that rf-archive.com itself wasn’t dead — DNS or routing was the problem. The server was still serving content if you talked to it directly.
Step 5: Search internally like a normal user (but better)
Now that I had access to the actual site, I fired up Burp. I set up Match & Replace rules to automatically inject the correct Host: rf-archive.com header into every request.
From there, I opened up Cracking - Combolist Removed Content and started looking for the thread mentioned in the challenge.
Finally - a username.
Step 6: Identify the thread author
The archived post showed the thread author username:
1
RoNey
That was the first confirmed identifier tied directly to the original post.
Step 7: Pivot to leaked data
With the username, the next step was obvious: check leaked forum databases.
I searched through RaidForums leaked database and found a matching record:
This is the point where the investigation really opens up.
Step 8: Email-based OSINT
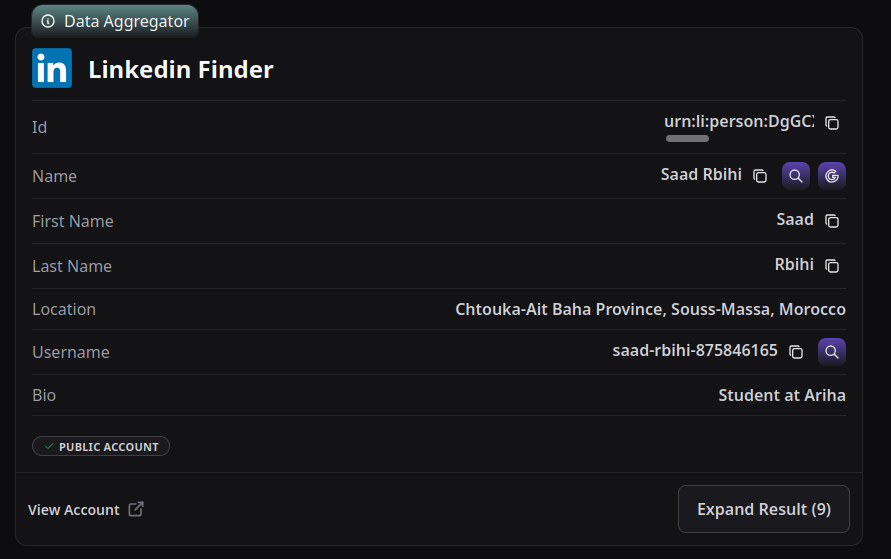
I ran the email through osint.industries, and it returned a lot of linked data — accounts, reused usernames, platform traces.
From Linkedin Finder results, two major attributes were showing up:
First name: Saad
Country: Morocco
The first name appeared across multiple results.
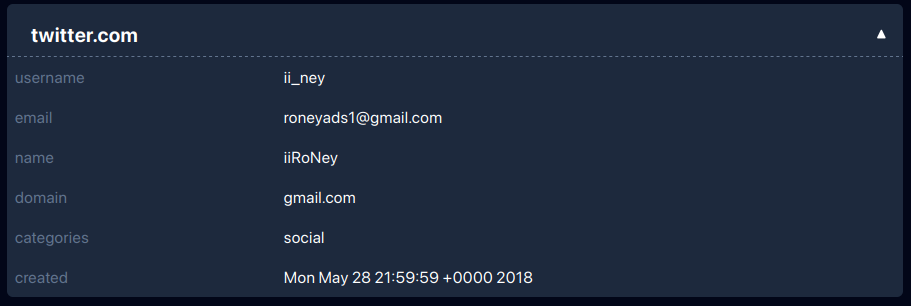
Step 9: Final pivot — Twitter handle
The last missing piece was a Twitter handle. From osint.industries report, we see that the email is mentioned in Twitter breach.
Using breach.vip, I searched for that email. That led me straight to the handle:
1
ii_ney
At this point, everything lined up cleanly:
Forum username
Email address
Real first name
Country
Twitter handle
Correct Flag
1
OSINT{roneyads1@gmail.com-ii_ney-Morocco-Saad}
Final thoughts
This challenge wasn’t about fancy tooling — it was about not trusting the obvious path and knowing when to pivot. The biggest breakthrough came from realizing the archive wasn’t gone, just badly exposed.
Host headers still save lives.
Thanks to the osint.industries team for this event! Hope to see more events like this in the feature.
There’s something oddly satisfying about running a web server that only you can access — no authentication prompts, no IP whitelisting, no cloud firewall configs. Just a stealthy NGINX instance humming away behind an unlisted door. In this post, I’ll walk you through a method I used to make my NGINX server invisible to the public, while remaining fully accessible to me.
🧠 The Idea
The approach is simple:
Register no public domain.
Generate a self-signed SSL certificate for a fake domain.
Configure NGINX to serve only that domain.
Add a local DNS entry on my machine with /etc/hosts so I can reach it.
Everyone else? They hit a wall.
🔧 Step-by-Step: Cloaking the Server
1. Create a “Secret” Domain
Pick a domain that doesn’t exist (never registered, never exposed). This is your private signal to the server that the request is legit.
1
sudo vim /etc/hosts
Add this line (replace with your server IP):
1
123.123.123.123 secret.domain
Now your machine knows how to reach it — no one else does unless they know the exact hostname and IP combo.
2. Generate a Self-Signed SSL Cert
No need to use Let’s Encrypt or buy a cert. Just create your own:
http { include /etc/nginx/mime.types; default_type application/octet-stream; access_log /var/log/nginx/access.log;
# Catch-all server that silently closes all unmatched requests server { listen80 default_server; listen [::]:80 default_server; server_name _; return444; # Drop connection with no response }
# Redirect HTTP to HTTPS for the secret domain server { listen80; server_name secret.domain; return301 https://$host$request_uri; }
# Only accept requests over HTTPS to the secret domain server { listen443 ssl http2; server_name secret.domain www.secret.domain;
Security by obscurity: Not a complete security solution, but it helps.
No DNS records: If it’s not resolvable publicly, it’s already a major hurdle.
No open ports for unknown domains: The default_server block ensures all unmatched requests get dropped with a 444 (no response).
Custom certs: No involvement from any certificate authority means no cert transparency log exposure.
🕵️♂️ Could Someone Still Find It?
Yes, but it’s highly unlikely:
They’d need to know both your server’s IP and the exact made-up domain.
They’d need to spoof the Host header and accept your self-signed cert.
Port scanning won’t help them — they’ll get silence unless they send the right SNI + Host combo.
If you want even more stealth, you can:
Restrict IPs with allow/deny.
Hide server banners with server_tokens off.
Use a VPN, SSH tunnel, or IPv6-only setup.
🧪 Final Thoughts
This method won’t replace proper firewalls or authentication — but it’s a cool, minimalist way to hide a service in plain sight. Great for internal tools, private dashboards, or any low-risk project where invisibility adds a layer of peace of mind.
Recently, I stumbled upon a domain using Cloudflare services and got curious about what other domains might be tied to the same Cloudflare account. So, I started looking into using reverse NS (Name Server) lookup methods. Here’s how I approached it and the tools that proved effective.
Understanding Cloudflare NS Format
When you sign up for a Cloudflare account, you get two unique name servers that look something like this:
These name servers are used for all domains linked to your Cloudflare account, making it easier to track down other domains connected to it.
How I Did It
To find domains associated with a Cloudflare account using their name servers, I tried out several reverse NS lookup services. Many of these tools only let you search one name server at a time, which can be a bit of a hassle. But I found that search.dnslytics.com stood out as a reliable option.
Using search.dnslytics.com
Getting Started: Signing up on search.dnslytics.com gives you access to their reverse NS lookup tool. The basic free version gives you about 50 results per query, but if you opt for their paid subscription (which costs 26 euros per month), you can dig deeper and get 80 to 100 results per query.
Running the Query: To pinpoint domains using specific Cloudflare name servers, you simply enter the following query:
1
ns: "random-boy-name.ns.cloudflare.com" and ns: "random-girl-name.ns.cloudflare.com"
This command fetches a list of domains using these particular name servers, revealing other domains tied to the Cloudflare account you’re interested in.
Conclusion
Using tools like search.dnslytics.com for reverse NS lookups is a smart way to uncover domains sharing Cloudflare services under the same account. Keep in mind that while some domains might use the same name servers coincidentally, this method is generally effective for discovering associated domains.
Give reverse NS lookup a try to explore and analyze domains efficiently, gaining valuable insights into Cloudflare account associations.
TL;DR
Register account on search.dnslytics.com.
Choose domains in a search bar.
Enter this query:
1
ns: "random-boy-name.ns.cloudflare.com" and ns: "random-girl-name.ns.cloudflare.com"
@telesint_bot is a professional tool designed for researching Telegram groups and users. It provides insights into which groups a Telegram user is currently or has been a member of.
Getting started
When you first send the /start command the bot will give you 3 free requests. To get more you would need to submit a group with more then 20 members that is not yet in the bot’s database.
To locate these groups, we utilize another bot, @tgdb_bot. While there are other services available, I find this one to be the most effective. However, it has a daily limit of 50 requests, That will be enough for our use case.
Searching for Groups
To search for groups using @tgdb_bot, use the command /groups <your query>. Here’s how to construct your query:
Begin with a popular topic such as a programming language, framework, or Linux distribution.
Optionally add terms like chat, talk, comm, or community to refine your search.
You can also translate your query into other languages such as Russian, Ukrainian, Hindi, Chinese, or Indonesian.
The bot will provide a list of relevant groups that you can then submit to @telesint_bot. You can only submit one at a time and the bot has rate limiting. 2 seconds between messages will be enough.
Automated script
I’ve developed a Python script to automate the process. You can access it here: telesint4life.
To use the script, follow these steps:
Installing dependencies: Run this command:
1
pip install -r requirements.txt
Configuration Setup: Create a config.py file and include your api_id and api_hash credentials in this format:
1
2
api_id = 2134567
api_hash = "somestring"
You can obtain these credentials by visiting my.telegram.org/auth?to=apps. Sign in to your Telegram account, create a new app or retrieve the credentials from an existing one.
Usage: Once configured, you can execute the script to start researching Telegram groups efficiently